How to Change a Smoke Detector: A Complete Step-by-Step Guide for Home Safety
Your smoke detector is one of the most important safety devices in your home. It stands guard 24/7, ready to alert you at the first sign of smoke or fire. But like any other appliance, smoke detectors don’t last forever. Knowing how to change a smoke detector ensures your home remains safe, compliant with safety regulations, and ready to protect your family at all times.
In this comprehensive guide, we’ll walk you through everything you need to know about changing your smoke detector — from recognizing when it’s time to replace it to installing a new one correctly.
Why It’s Important to Change Your Smoke Detector
Before learning how to change a smoke detector, it’s essential to understand why it matters. Smoke detectors have a limited lifespan, typically between 8 to 10 years, depending on the model and manufacturer. Over time, their sensors lose accuracy and become less effective at detecting smoke or heat.
If your smoke alarm is outdated, it might not respond quickly in an emergency, which can be the difference between safety and disaster. Regular maintenance and timely replacement ensure your smoke detector continues to function at its best.
Here are some key reasons to replace your smoke detector:
- Expired sensors: Old detectors may not detect smoke as efficiently.
- Frequent false alarms: If your alarm keeps beeping for no reason, it might be time for a new one.
- Battery corrosion or wear: Over years, battery contacts can degrade, affecting performance.
- Safety regulations: Many building codes recommend replacing smoke alarms every 10 years.
How to Know When It’s Time to Replace Your Smoke Detector
You might not think about your smoke alarm often, but it gives signs when it needs attention. Here’s how to tell if it’s time for a replacement:
- Check the expiration date: Look for a manufacture or expiration date on the back of the detector. If it’s older than 10 years, replace it immediately.
- Frequent beeping or chirping: Repeated low-battery or malfunction chirps, even after changing batteries, indicate a failing unit.
- Discoloration: Yellowing or fading of the plastic housing can signal age and wear.
- No response during testing: If pressing the “Test” button doesn’t trigger the alarm, it’s time for a new one.
- Upgrading to better technology: Newer models may include smart features, dual sensors, or integrated carbon monoxide detection.
Types of Smoke Detectors
Before changing your smoke detector, identify which type you have. Understanding the type helps you choose the right replacement.
1. Ionization Smoke Detectors
These are highly responsive to flaming fires. They work by using a small amount of radioactive material to ionize air, detecting smoke particles quickly.
2. Photoelectric Smoke Detectors
These are more responsive to smoldering fires and detect smoke through a light sensor that identifies particles in the air.
3. Dual-Sensor Smoke Detectors
As the name suggests, these combine both ionization and photoelectric sensors for comprehensive protection.
4. Smart Smoke Detectors
Modern devices can connect to Wi-Fi, send alerts to your phone, and even integrate with home automation systems.
Knowing your smoke detector type will guide you when purchasing a replacement model that best suits your home’s needs.
Tools You’ll Need to Change a Smoke Detector
Changing a smoke detector is simple and doesn’t require special tools. However, having the right items ready makes the process smoother.
Here’s what you’ll need:
- A ladder or step stool
- A screwdriver (Phillips or flathead, depending on your model)
- A new smoke detector (same type or upgraded model)
- New batteries (if your device isn’t hardwired or uses replaceable batteries)
- Optional: Drill and screws (if mounting a new base plate)
Step-by-Step Guide: How to Change a Smoke Detector
Now let’s get into the actual process of how to change a smoke detector safely and efficiently.
Step 1: Turn Off Power (for Hardwired Detectors)
If your smoke detector is connected to your home’s electrical wiring, switch off the power from your circuit breaker. This step ensures safety while removing or installing the new unit.
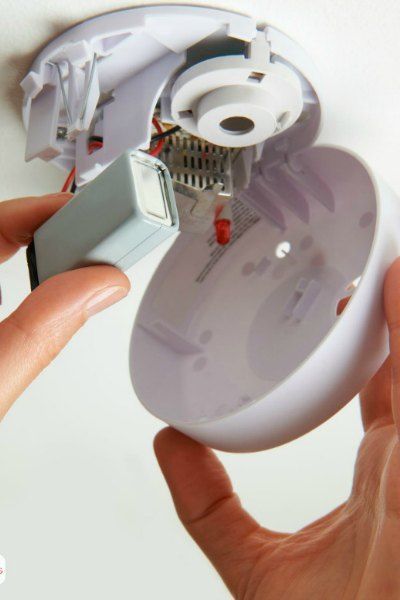
Step 2: Remove the Old Smoke Detector
Climb up carefully using your ladder and twist the smoke detector counterclockwise (or follow your model’s specific removal instructions). Once detached, gently pull it down.
If it’s a hardwired detector, disconnect the wiring harness by pressing the release tab. For battery-operated units, simply remove the batteries and detach the base plate.
Step 3: Inspect and Clean the Area
Before installing the new unit, inspect the mounting bracket and surrounding area. Remove dust, cobwebs, or residue that might interfere with the new detector’s performance.
If the new model requires a different base plate, unscrew and remove the old one.
Step 4: Install the New Mounting Plate
Most new smoke detectors come with a new base plate. Align it with your ceiling or wall holes, and use screws or anchors to secure it tightly.
Ensure the plate sits flush and stable — a loose base can affect how well the detector senses smoke.
Step 5: Connect the Wiring (for Hardwired Models)
If your detector is hardwired, connect the new unit’s harness to your home’s wiring. Match the wire colors (usually white to white, black to black, and red if available for interconnection).
For battery-only models, skip this step.
Step 6: Attach the New Smoke Detector
Align the detector with the base plate and twist it clockwise until it locks into place. Make sure it feels secure.
Step 7: Insert Fresh Batteries (If Needed)
If your smoke alarm uses batteries, insert new ones before testing. Always use high-quality batteries for long-lasting performance.
Step 8: Turn the Power Back On
If your smoke detector is wired to your electrical system, restore power at the circuit breaker.
Step 9: Test the New Smoke Detector
Press and hold the “Test” button for a few seconds. You should hear a loud alarm sound — confirming that your device is working properly.
If the sound is weak or absent, double-check your connections or battery placement.
Tips for Maintaining Your Smoke Detector
Once you’ve learned how to change a smoke detector, regular maintenance is key to keeping it effective.
- Test monthly: Press the test button every month to confirm it’s working.
- Replace batteries annually: Even if they still seem fine, fresh batteries ensure reliability.
- Clean regularly: Use a vacuum or soft cloth to remove dust buildup from the vents.
- Replace every 10 years: Even with proper care, sensors degrade over time. Mark your calendar for the next replacement date.
Common Mistakes to Avoid When Changing a Smoke Detector
Many homeowners make small but critical errors when replacing their smoke detectors. Avoid these common mistakes:
- Forgetting to shut off power: For hardwired models, always turn off electricity before handling wires.
- Not testing after installation: Always test to ensure proper function.
- Installing in the wrong location: Avoid placing smoke detectors near vents, fans, or kitchens where false alarms are frequent.
- Ignoring manufacturer instructions: Each model may have unique installation requirements.
- Using old batteries: Always start with new batteries when replacing your smoke alarm.
Ideal Locations for Smoke Detectors
Installing your smoke detectors in the right locations maximizes their effectiveness. Experts recommend:
- In every bedroom
- Outside each sleeping area
- On every level of your home, including basements
- At least 10 feet away from kitchens to prevent false alarms
Mount them on the ceiling or high on the wall since smoke rises. For vaulted ceilings, place them within 3 feet of the peak.
When to Call a Professional
While changing a battery-operated smoke detector is simple, hardwired systems might need professional help. If you’re unsure about electrical wiring or your detectors are interconnected, hiring a certified electrician ensures safe and compliant installation.
Additionally, if your smoke alarm system integrates with a security system or smart home network, professional setup may be necessary for proper synchronization.
Conclusion
Knowing how to change a smoke detector is an essential part of home maintenance and safety. It’s a simple process that only takes a few minutes but can make a life-saving difference.
By replacing outdated units, testing regularly, and keeping up with maintenance, you ensure your home remains protected from fire hazards. Whether you choose a basic battery-operated alarm or a modern smart smoke detector, staying proactive about smoke detection is one of the smartest decisions you can make for your household.